21 Oct Our Tips for Using Crown Molding
At Home Works Painting, we’re not just painting contractors. We also provide other services such as carpentry and power washing for our Northern Virginia clients. For example, we can install crown molding, an elegant decorative element that can significantly change the appearance of a space. Think of it as an element that can give the room a finished look or emphasize a specific design style. If you’re not sure where to install it, read on for some tips on what you can do with crown molding in your home.
Ceiling
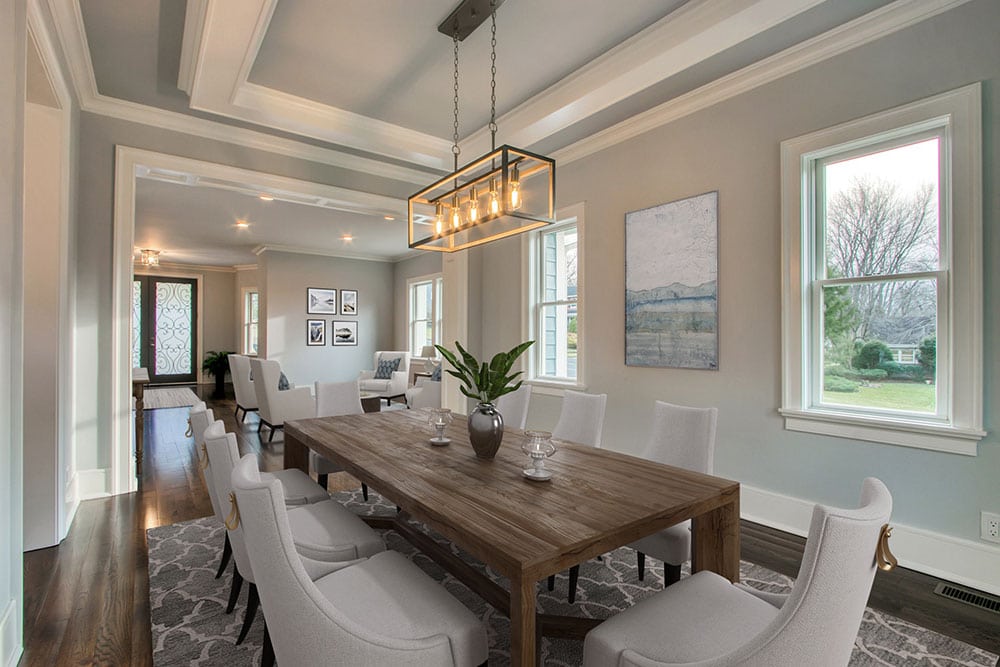
The most common place you’ll find crown molding is where the ceiling meets the wall. Just as baseboards visually anchor the room, the crown molding visually frames the room. The molding can be intricate for a more formal design or simple for a modern appearance.
Cabinets
You can use crown molding above any cabinetry to give it a custom, built-in appearance that’s elegant. This can be done with kitchen cabinets. It’s a relatively straightforward project with big returns on looks.
Built-Ins
Just as you can add crown molding to cabinetry, you can also do it with built-in storage. Add crown molding at the top to give the cabinets an elegant and integrated custom appearance.
Doorways
Another way to use crown molding that offers a significant return on investment is to encase doorways or archways. This adds immediate prominence and elegance to the opening, accentuating an otherwise bland transition between rooms. Often, you can add the molding to the top of the door frame without removing the frame, giving you twice the look.
Windows
Sometimes, crown molding can frame a window, giving it more prominence in the space. If the window is tall enough, its frame can be incorporated into the ceiling’s crown molding.
Corner Blocks
Consider adding corner blocks to your crown molding if you want a more traditional look. Corner blocks are decorative pieces that come in different styles. However, they add a more ornate appearance to the crown molding.
We’re happy to discuss your project with you and offer our expert opinion. Contact our office or use our online scheduler if you would like to schedule a free, no-obligation estimate.
FAQ
1. What are the best locations in my home to install crown molding?
Crown molding is traditionally placed at the joint where the wall meets the ceiling, but it can also be used above kitchen cabinets for a built-in look, along the tops of bookshelves to create a custom appearance, around windows to make them look taller, and above doorways to accentuate entrances. It can also be used creatively on walls to add architectural interest and style.
2. How should I prepare crown molding before painting for the best results?
Proper preparation is essential for a flawless finish. Begin by thoroughly cleaning the molding to remove dust and oils. Sand the surface lightly with fine-grit sandpaper to smooth out imperfections and create a surface the paint can adhere to. Fill any gaps or nail holes with wood filler and apply a quality primer before painting.
3. What painting techniques work best for crown molding?
Use a high-quality angled brush and hold it at a 45-degree angle for precise control. Apply paint in small, controlled strokes and overlap each stroke slightly to maintain a wet edge, which helps prevent lap marks. Pay extra attention to corners and joints, using a feathering technique to blend paint and avoid buildup.
4. What type and sheen of paint should I use on crown molding?
Premium water-based paints formulated for trim are generally recommended for their durability and easy cleanup. Semi-gloss is a popular sheen choice because it highlights the molding’s details and is more durable, but flat or satin finishes can be used for a subtler look if desired.
5. Are there any tips for getting clean paint lines and avoiding paint bleed on crown molding?
Use high-quality painter’s tape and press down the edges firmly with a putty knife or similar tool to create a tight seal. Apply the tape in continuous strips rather than small pieces to minimize paint bleed. After painting, remove the tape carefully to reveal crisp, clean lines between the molding and adjacent surfaces.

Mike Katounas is the owner of Home Works Painting, a painting business in Northern Virginia. He has over 15 years of experience in residential interior and exterior painting, drywall installation/repair, carpentry, wallpaper removal, power washing, commercial painting, color consultation, and staining/sealing. Their service areas include Chantilly, Fairfax, Herndon, Oakton, Reston. Mike takes pride in his work, and he always follows a strict code of conduct that includes the use of quality paint, a clean workspace, and an honest, respectful approach to his customers.


Sorry, the comment form is closed at this time.