26 Aug Oakton Kitchen Makeovers with Painted Cabinets
Cabinets can transform your Oakton kitchen when you choose painted finishes that balance style and durability; as you plan, expect dramatic, cost-effective results and pick finishes that stand up to wear. You should also be aware of lead paint risks in older cabinetry and pungent fumes, so ensure proper testing and ventilation, or hire professionals. For dependable, expert service, contact Home Works Painting at https://homeworkspainting.com/ to protect your investment and achieve a lasting update.
Key Takeaways:
- Painted cabinets offer a high-impact Oakton kitchen makeover at a fraction of the cost and time of a complete remodel — a smart way to refresh style and improve resale appeal quickly.
- Professional prep and premium coatings (sanding, priming, and durable topcoats) produce a smooth, long-lasting finish; pairing paint with new hardware and lighting completes the transformation.
- Home Works Painting knows Oakton trends and color options (whites, soft neutrals, deep blues, and two-tone schemes) and can create a tailored plan — learn more at https://homeworkspainting.com/.
The Transformative Power of Paint
The Psychology of Color Selection
You make emotional choices when you pick cabinet colors: blues and greens calm, warm neutrals energize, and deep charcoals add sophistication. On several Oakton projects, we paired a soft green backsplash with white upper cabinets to create a relaxed, coastal feel that buyers loved. Use color strategically—cool tones tend to recede visually, making cluttered kitchens feel calmer, while bold hues create focal points for open-plan designs.
How Paint Transforms Space Perception
Light, reflective finishes can make your kitchen feel brighter and more open without structural changes; semi-gloss or satin on cabinets improves reflectivity and is easier to clean. Dark bases with light uppers visually raise ceilings, a trick we used in an Oakton condo to balance a low ceiling and give the room a taller appearance.
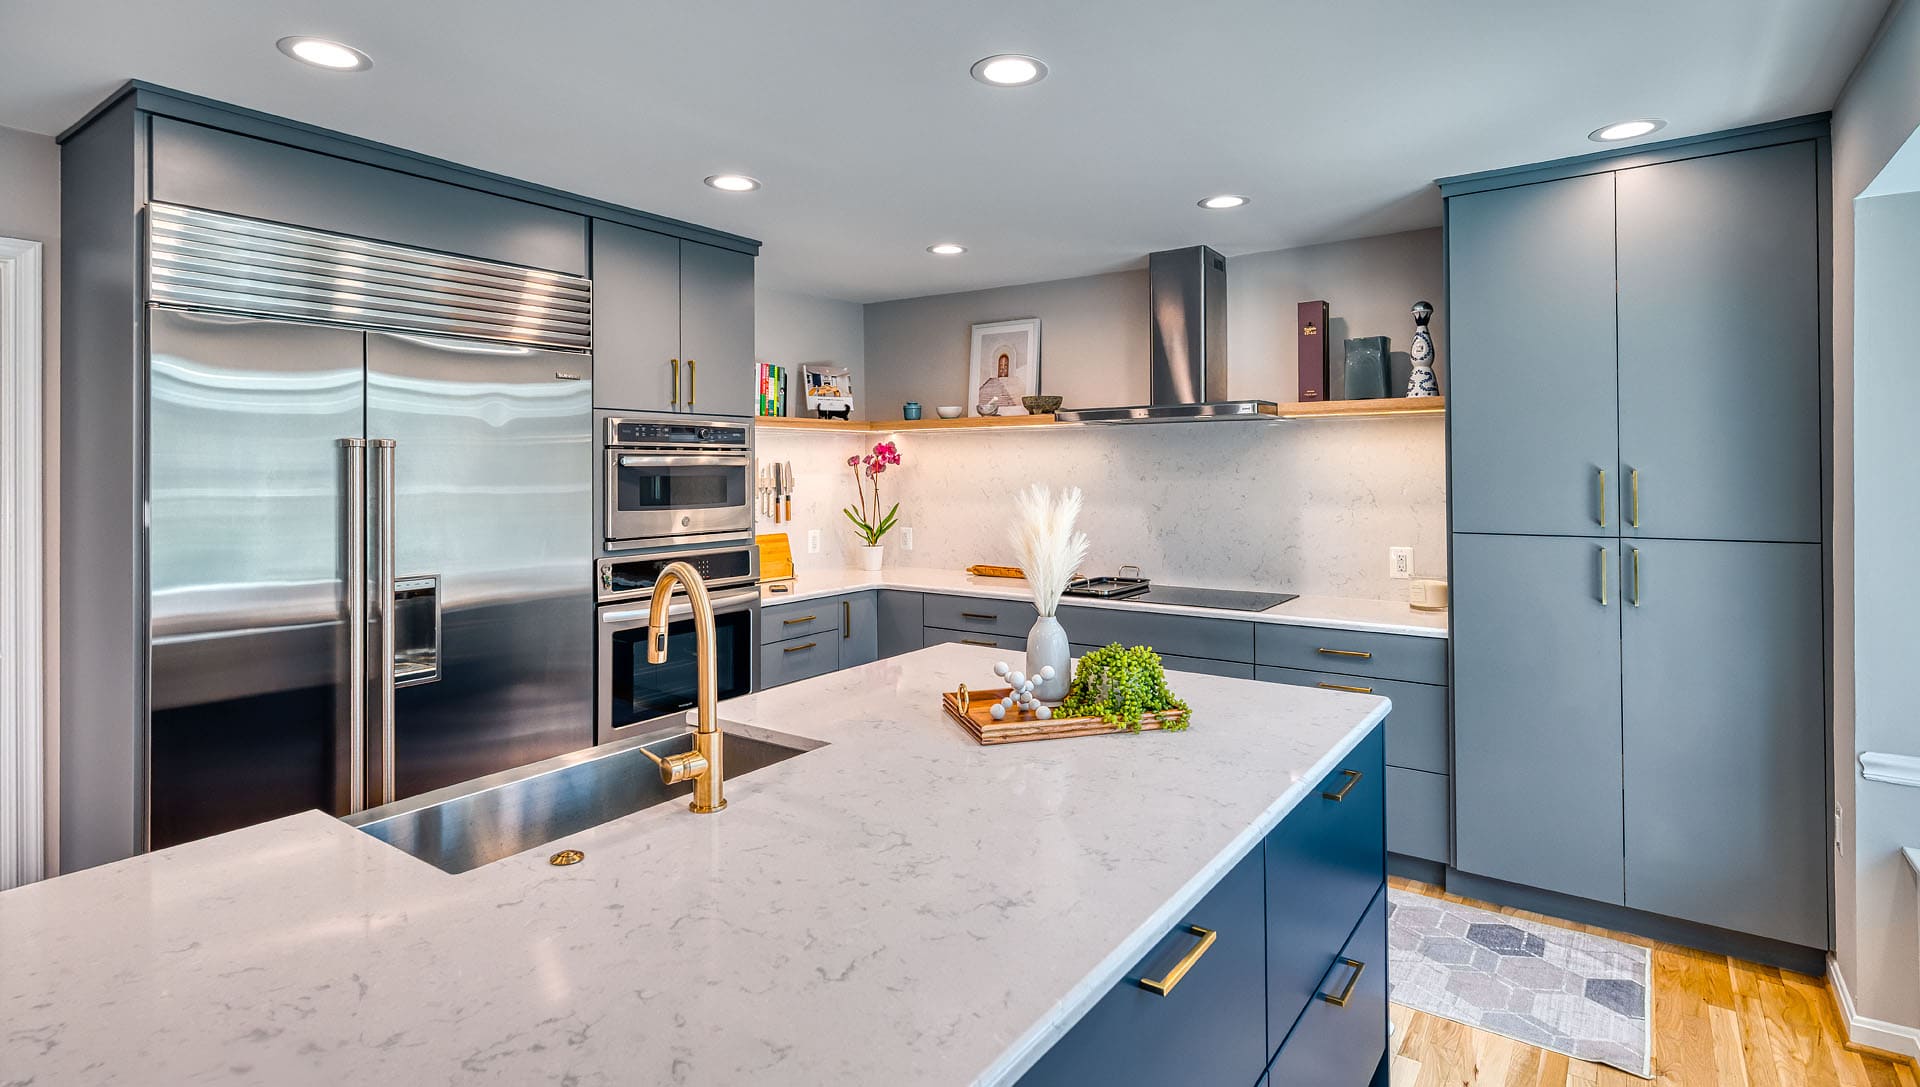
Contrast and value matter: painting lower cabinets a darker value anchors the room, while lighter uppers increase perceived volume. For example, pairing a deep navy island with off-white perimeter cabinets produced a perceived increase in floor space and drew attention to the island as the social hub. Avoid high-sheen finishes on imperfect wood—high gloss highlights flaws—and choose paint formulated for cabinetry to resist chipping and stains so your makeover lasts.
Preparing for a Cabinet Makeover
Assessing Kitchen ‘shen’s Aesthetic Needs
Survey finishes, hardware, and traffic patterns to choose a direction: do you want a high-contrast island, an all-white refresh, or two-tone cabinets? Pick 3–5 swatches and apply test patches on both a shaded and sunlit wall; evaluate at morning and evening light. Note wear areas—drawer fronts and lower doors often need more sanding or filler—and decide if swapping hardware (brass, matte black, or brushed nickel) will achieve the look before you begin stripping or painting.
Choosing the Right Paint and Technique
Match paint type to material and use: waterborne alkyds deliver the hardness of oil with low-VOC cleanup, acrylic latex works for laminate with a good bonding primer, and traditional oil-based enamels still offer strong durability in high-traffic kitchens. Aim for 2–3 thin coats and a satin or semi-gloss sheen for cleanability; consider an HVLP sprayer for a factory-smooth finish or a high-quality brush and foam roller for budget builds.
Primer selection matters: use a shellac-based primer for tannin bleed or stubborn stains, a high-bonding primer for slick laminates, and an anti-corrosive primer where bare wood shows. Sand cabinet faces with 120–220 grit before priming and wet-sand between topcoats with 320–400 grit to remove brush marks. Expect typical dry times of 2–6 hours between coats, depending on humidity—Oakton summers at 60–80% RH will slow cure—and plan for full rehang and hardware reinstall around day 3 for an average 20–30 door kitchen. Test for lead if your home was painted before 1978; lead dust exposure is dangerous, and you should hire a certified abatement contractor if tests are positive. For a recent Oakton project, Home Works Painting used Benjamin Moore ADVANCE (waterborne alkyd), applied two topcoats with an HVLP sprayer, and achieved a durable, showroom finish in three days.
Step-by-Step Cabinet Painting Process
Step-by-Step Checklist
| Step | Action & Details |
|---|---|
| 1. Remove & Label | Remove doors, drawers, and hardware; number each piece with masking tape and store hinges/screws in labeled zip bags to speed reassembly. |
| 2. Degrease | Clean with trisodium phosphate (TSP) or a commercial degreaser; rinse and let dry 30–60 minutes to avoid adhesion problems. |
| 3. Sand | Start with 120–150 grit for rough surfaces, finish with 220 grit for primer adhesion; use a random-orbit sander for flat panels. |
| 4. Fill & Repair | Use wood filler or epoxy on gouges; sand smooth and recheck fit before priming. |
| 5. Prime | Apply a bonding primer (e.g., waterborne alkyd or shellac-based) — one coat for existing paint, two coats for raw wood; allow 2–6 hours dry depending on product. |
| 6. Paint | Apply 2–3 topcoats of cabinet-grade paint (acrylic polyurethane or waterborne alkyd). Expect 2–4 hours between coats for waterborne alkyd, 6–8 for traditional alkyd. |
| 7. Cure & Reassemble | Let it finish curing for 5–7 days before heavy use; then reinstall the hardware and doors, adjusting for alignment and gaps. |
Essential Tools and Materials. You’ll need a random-orbit sander, 120 and 220 grit sandpaper, tack cloths, quality angled brushes, an HVLP or airless sprayer option, painter’s tape, labeled zip bags, a bonding primer (waterborne alkyd or shellac), cabinet-grade paint (acrylic polyurethane or waterborne alkyd), and a respirator rated for paint fumes. Protective gloves and good ventilation reduce health risks when you use solvent-based products.
Surface Prep: Cleaning, Sanding, and Priming
Start by degreasing surfaces with TSP or orange-solvent cleaner; oil residue can cause fish-eyes or peeling. Sand next—use 120–150 grit to remove sheen and 220 grit to feather edges. Apply a bonding primer—Zinsser BIN for tannin bleed or a waterborne alkyd primer for smooth builds; one coat suffices for painted cabinets, two for raw wood. A dry, dust-free environment cuts defects dramatically.
After sanding, use a high-tack tack cloth and vacuum with a brush attachment to remove particles; even tiny dust specs show under satin finishes. For stain-prone woods like oak, apply shellac sealer first to block tannins, then prime with a bonding primer. Allow primer to dry to the manufacturer’s specified time—most waterborne primers need 2–4 hours, shellac-based ones set within 30–60 minutes—then sand lightly with 220 grit before topcoats to promote mechanical adhesion.
Application Techniques: Brushes vs. Sprayers
For small jobs and touch-ups, a high-quality polyester brush and foam roller work well, ensuring a smooth finish. Plan on 2–3 days for a 12-door kitchen. Sprayers (HVLP or airless) produce the most factory-like finish and can cut application time to a single day, but require masking and more prep. Spraying increases overspray and ventilation needs, so protect floors and nearby surfaces.
Choose an HVLP sprayer for fine control and softer edges on inset panels; an airless sprayer suits thicker cabinet paints and faster coverage. Thin waterborne alkyd by 510 according to % manufacturer’s instructions for sprayers, and test on scrap wood to dial atomization. Maintain a 6–10 inch distance and overlap passes by 50% to avoid runs; if you see orange peel, reduce flow or increase passes rather than adding thinner.
Common Pitfalls and How to Avoid Them
Miscalculating Drying Times
Humidity, temperature, and paint chemistry change cure windows dramatically: at the industry standard of 70°F/50% RH, many water-based cabinet enamels reach a tack-free state in 2–4 hours and are safe to recoat after 4–6 hours, while oil-based enamels often need 18–24 hours. If you rush sanding or stacking doors, you risk surface lifting, visible brush marks, and adhesion failure. Plan for weather extremes (low temps can double cure time) and always follow the manufacturer’s recoat interval on the can.
Choosing the Wrong Finish
Sheen choice affects durability and appearance: flat or matte hides surface flaws but will stain and scratch more easily, whereas satin to semi-gloss provides the scrubbability most kitchens need. For a high-traffic Oakton family kitchen, you’ll generally want at least a satin, and for islands or cabinet fronts where kids touch often, choose semi-gloss or a durable waterborne alkyd enamel.
Dive deeper into finish selection by matching function and lighting: high gloss (60–90 sheen units at 60°) shows every imperfection. It amplifies color saturation, which can make small gaps or brush strokes obvious under recessed LED lighting standard in Oakton remodels. Low-sheen finishes (5–20 units) mask flaws but require more frequent cleaning or touch-ups. Also, check compatibility—waterborne primers and enamel topcoats work together best; applying a traditional oil topcoat over a modern acrylic without a proper adhesion primer can cause peeling. In our projects, we specify product systems (e.g., waterborne alkyd topcoat over an alkyd-blocking primer) and recommend satin/semi-gloss on horizontal faces and high-contact verticals to balance looks with long-term performance.
Maximizing Your Investment: The Financial Benefits of Painted Cabinets
Cost-Benefit Analysis of DIY vs. Professional Help
You can save $1,000–$4,000 doing the job yourself—supplies typically run $200–$800 for primer, paint, brushes, and hardware—but expect weekends of work and a learning curve. Hiring pros for an average Oakton kitchen usually costs $2,500–$7,500, and that price buys certified prep, factory-grade coatings, and a finish that resists chipping and yellowing; professionals commonly finish in 3–5 days, minimizing disruption to your routine.
Rising Home Values and Kitchen Appeal
Painted cabinets often deliver a high return: minor kitchen refreshes typically recoup 60–80% of their cost at sale while improving listing photos and buyer interest, which can shorten time on market by several weeks; agents consistently cite updated cabinetry as one of the top factors buyers noticefirOakton’sakton’ssmyou’lllyou’lll see the most substantial payoff when painted cabinets are paired with new hardware and targeted staging—spending around $2,500–$4,500 on a professional cabinet refresh can realistically result in a $5,000–$12,000 perceived uplift at listing, faster offers, and fewer negotiation concessions. Take care to avoid common DIY pitfalls such as inadequate sanding or using the wrong topcoat—those errors lead to peeling, staining, and water damage that reduce value. You can get a local estimate and warranty details from Home Works Painting at https://homeworkspainting.com/ to compare projected costs and long-term durability before deciding.
Trending Cabinet Colors for Oakton Kitchens
Classic Whites and Grays
Clean whites and soft grays remain dominant choices in Oakton because they make spaces feel larger and more timeless; you might select a high-LRV white for north-facing kitchens to boost brightness or a mid-tone gray like Repose Gray for warm, neutral depth. Specify a semi-gloss or durable acrylic enamel for cabinets to ensure a wipeable surface, and plan for two topcoats over primer to prevent chipping in high-traffic areas.
Bold Hues: Navy, Forest Green, and Beyond
Deep navy and forest green add instant personality—popular as island colors or lower cabinetry to anchor open-plan Oakton kitchens while letting white uppers keep the room airy. Pair navy with brass hardware and quartz countertops for a high-end look, but note that darker paints show dust and fingerprints more readily, so choose finishes and maintenance routines accordingly.
Recent Oakton updates have shown that painting the island in Benjamin Moore Hale Navy or Sherwin-Williams Naval, paired with warm brass pulls, can transform ordinary layouts into focal points. Try a matte or satin finish on flat-panel doors and a slightly higher-sheen enamel on trim for durability; sand with 220-grit between coats for a smooth, factory-like result. Always test a 2×2-foot patch in morning and evening light—undertones shift dramatically under different lighting, and samples don’t reveal the full effect.
Mixing and Matching Colors for a Unique Look
Two-tone schemes let you balance drama and restraint: use a bold color on the island or lower cabinets and a neutral on uppers to keep the room feeling open. A practical rule is 70/30 or the interior design 60/30/10 split—majority neutral, secondary bold, and a slight accent color for hardware or backsplash—to maintain visual harmony in your Oakton kitchen.
Combine a warm oak stain on lower runs with painted white uppers to retain texture while modernizing the palette, or pair cool-grain countertops with warm-gray bases for contrast. Watch undertones closely—a warm gray can clash with a cool blue—so place large paint cards next to your countertop and tile before finalizing. If you need help visualizing combinations, Home Works Painting can create 2–3 mockups and paint ephemeral test panels, allowing you to approve the exact pair of your home’s lighting.
Eco-Friendly Painting Solutions
Sustainable Paint Options Available
Choose zero-VOC paints (<5 g/L) or certified low-VOC options (<50 g/L) such as Benjamin Moore Natura, ECOS, or AFM Safecoat, and consider water-based acrylic enamels for cabinets for durability. Natural alternatives like milk or clay paints work for accent pieces, while GreenGuard Gold or LEED‑approved products give you measurable environmental credentials. Durable finishes can cut repaint frequency, often lasting 10+ years on well‑prepped cabinetry, lowering lifetime ecological impact.
Health Impacts of Paint Choices
High‑VOC solvent paints (>250 g/L) can trigger headaches, dizziness, eye and throat irritation, and worsen asthma symptoms; indoor air often measures 2–5 times the pollutant levels of outdoors, so your paint choice matters. You reduce immediate exposure by using zero/low‑VOC products, ventilating during application, and selecting paints with third‑party certifications like GreenGuard Gold or the EPA Safer Choice label.
Vulnerable occupants—children, pregnant people, and those with respiratory conditions—face the highest risk from prolonged VOC exposure, so you should request product Safety Data Sheets and opt for water‑based primers (oil‑based primers typically emit more VOCs). Off‑gassing can persist for days to weeks; run exhaust fans and open windows for at least 48–72 hours, use a HEPA/activated‑carbon air purifier for faster clearance, and consider professional application to control overspray and ensure proper ventilation. These steps cut indoor VOC peaks and protect your household during an Oakton kitchen makeover.
Real-Life Success Stories from Oakton Homeowners
Before and After Transformations
One Oakton split-level saw 30 cabinet faces and 16 drawers go from dated honey oak to Benjamin Moore White Dove in a 5-day refresh by Home Works Painting (https://homeworkspainYo ”llom/).You’lll notice the kitchen looked twice as bright, the cost was about $3,400, and proper sanding and primer avoided the common problem of peeling that homeowners often face with DIY kits.
Homeowner Testimonials and Insights
Local clients report that the most significant wins were appearance and budget. For instance, one homeowner estimated they saved $12,000 compared to a full cabinet replacement and saw their space feel modern within a week. Expect clear timelines, a two-coat finish, and workmanship warranties from pros like Home WorksPaint. Digging deeper, you’ll hear consistent advice: insist on sealed dust containment during work, confirm the crew will apply two coats of alkyd or waterborne enamel, and ask about dry time—most Oakton projects finished in 4–6 days. Those details translate into a finish that holds up; several clients reported no chipping after 3 years, which matters if you plan to sell or rent your home later.
Conclusion
Transform your Oakton kitchen with painted cabinets to achieve a fresh, durable, and stylish look that matches your tastes and budget. Home Works Painting offers expert color consultation, meticulous surface prep, and long-lasting finishes. Visit https://homeworkspainting.com/ to schedule an assessment and begin your makeover with confidence.
FAQ
Q: What does the painted-cabinet process look like for an Oakton kitchen makeover, and how long will the project take?
A: A professional painted-cabinet makeover is a multi-step process designed to deliver a factory-quality finish. Typical steps include an initial on-site consultation and measurement, removal or masking of doors and hardware, deep cleaning and degreasing, light sanding and any necessary repairs, application of a high-adhesion primer, followed by two finish coats (often sprayed for the smoothest result), reassembly and hardware reinstallation, and a short cure period before light use. For most Oakton kitchens, the timeline is 3–7 business days when work is done on-site; if doors are taken to our shop for spraying, expect 5–10 business days depending on workload and curing times. Factors that change duration include the condition of existing cabinetry, how many pieces need repair or resealing, whether we’re changing door styles, and seasonal humidity in Northern Virginia (which can slow drying). Home Works Painting will provide a detailed timeline during the estimate so you know exactly what to expect.
Q: How durable are Oakton’s cabinets in Oakton’s climate, and what maintenance keeps them looking great?
A: When painted with high-quality, professional-grade paints and a durable topcoat (acrylic enamel or conversion varnish-type finishes commonly used by pro teams), cabinets hold up very well to daily kitchen use. Proper surface preparation and a topcoat resistant to moisture and abrasion are key to long-lasting results — these products withstand Oakton’s humid summers and temperature swings. For routine care, wipe spills promptly with a soft cloth and mild soap, avoid abrasive pads or harsh solvents, and use touch-up kits for small nicks. Hardware should be checked and tightened occasionally to prevent stress on painted surfaces. With professional application and sensible maintenance, homeowners typically enjoy attractive cabinets for many years; if you need specific finish recommendations or a maintenance plan for your kitchen’s materials, Home Works Painting can advise during the estimate process.
Q: How much does a painted-cabinet makeover cost in Oakton, and how should I choose colors and finishes for my home?
A: Cost depends on scope and condition: variables include kitchen size, number of doors/drawers, extent of repairs, whether doors are sprayed off-site, and the finish selected. As a broad guideline, minor refreshes can start in the low thousands, while complete kitchen makeovers typically range higher; Home Works Painting pro’ll itemize quotes so you’ll see how each choice affects price. For color and finish selection, consider the style and natural light of your Oakton home: classic whites and soft neutrals open space and pair well with traditional or transitional homes; deep blues or greens add contrast and are popular for islands; matte or satin finishes hide imperfections, while semi-gloss is easier to clean in high-use areas. Coordinate cabinet color with countertops, backspaces, flooring, and the home’s overall palette. We offer color consultation and sample testing so you can view options in your actual lighting before committing. For a tailored estimate and color help, visit https://homeworkspainting.com/ or contact Home Works Painting directly.

Mike Katounas is the owner of Home Works Painting, a painting business in Northern Virginia. He has over 15 years of experience in residential interior and exterior painting, drywall installation/repair, carpentry, wallpaper removal, power washing, commercial painting, color consultation, and staining/sealing. Their service areas include Chantilly, Fairfax, Herndon, Oakton, Reston. Mike takes pride in his work, and he always follows a strict code of conduct that includes the use of quality paint, a clean workspace, and an honest, respectful approach to his customers.


Sorry, the comment form is closed at this time.